
Our SCIM Connectors manage application user accounts through the System for Cross-domain (SCIM) protocol. These integrations allow you to automate, and centralize user and group management, depending on the application's group management support, through the full lifecycle from your JumpCloud Administrator Portal.
After you integrate an application with JumpCloud, depending on an application's SCIM action support, you can provision, update, and deprovision users.
Using SCIM Connectors with JumpCloud
1 – Select an App
Select an application you want to connect with JumpCloud through SCIM. Ensure it has an Provisioning label in the Supported Functionality column - not all applications have both SSO/JIT and Provisioning functionality at this time. If you do not see your application listed, you may configure a custom SCIM integration or submit a request to have it added to the JumpCloud Integration Catalog.
![]()
In the Provisioning tab, you may see some application connectors with a Beta flag. We're evaluating these connectors in various real-world environments so we can gather feedback to ensure and enhance their performance.
2 – Configure Your App
You will need to enable SCIM for your Service Provider, obtain the Base URL (if needed) and generate a Token Key. Groups may also be supported.
3 – Import Users
If users have been created in the SP, but not in JumpCloud, a manual import may be initiated after SCIM configuration.
SCIM Actions
The following actions are supported with JumpCloud SCIM Connectors:
![]()
Not all applications support all three provisioning actions.
Provisioning
![]()
SCIM Provisioning differs in both its implementation and output from another type of web app provisioning, Just-in-Time.
Application support for provisioning means that JumpCloud can create user accounts in the connected application. This means that after you integrate an application with JumpCloud, and connect a new user to the application in JumpCloud, a new account is created for the user in the connected application with the following attributes:
| SCIM Attribute Name | JumpCloud Attribute Name | Notes |
|---|---|---|
| ExternalID | id | - |
| Username | Username | If a user with the specified username and email are found in the service provider application, JumpCloud takes over the account. If no user is found in the service provider application with the specified username and email, a new user is provisioned in the application with these attributes. |
| Password | Password | Users are provisioned with a temporary password. When the user sets their password, it is pushed to the application. Subsequent password updates are also pushed to the application. |
| GivenName | Firstname | - |
| FamilyName | Lastname | - |
| MiddleName | Middlename | - |
| Displayname | Displayname | - |
| Emails | Email - primary | If a user with the specified username and email are found in the service provider application, JumpCloud takes over the account. If no user is found in the service provider application with the specified username and email, a new user is provisioned in the application with these attributes. |
| Active | not Suspended and not PasswordExpired | - |
|
Addresses
|
Addresses
|
- |
|
Phones
|
Phones
|
- |
| EmployeeNumber | EmployeeIdentifier | - |
| Department | Department | - |
| Organization | Company | - |
| Title | JobTitle | - |
Updating
Application support for updating means that JumpCloud can update accounts on the connected application. This means that after you integrate an application with JumpCloud and connect a new user to the application in JumpCloud, anytime you update the user in JumpCloud, the user is updated in the application.
Deprovisioning
Application support for deprovisioning means that JumpCloud can remove user accounts from the connected application. This means that after you integrate an application with JumpCloud and disconnect a user from the application in JumpCloud, the user is deactivated in the application; the account still exists in the application, but it is placed in an inactive state.
For the most up-to-date list of supported SCIM connectors, see JumpCloud's Integration Catalog.
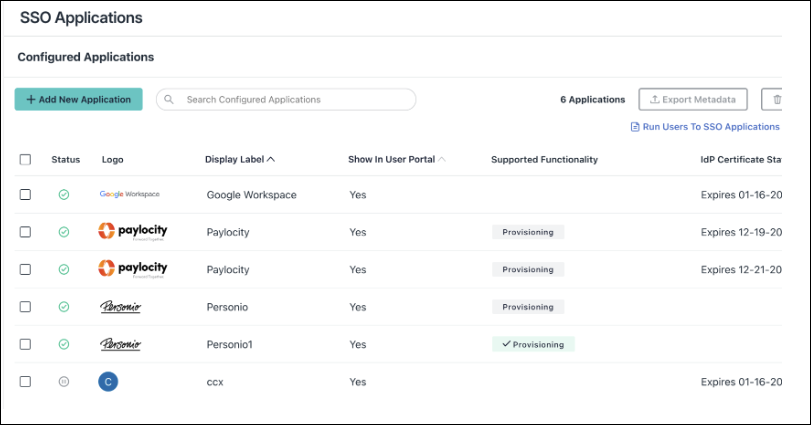
Connecting SCIM Applications to JumpCloud
Applications that have available prebuilt SCIM Connectors can be found in Configured Applications with the Provisioning badge displayed:
- A grey Provisioning badge indicates that SCIM is available, but not configured
- A green Provisioning badge indicates that the SCIM integration is active
- The absence of a Provisioning badge indicates there is no prebuilt SCIM connector available, but a custom SCIM connector may be configured
- Log in to the JumpCloud Admin Portal.
![]()
If your data is stored outside of the US, check which login URL you should be using depending on your region. If your organization uses LDAP, RADIUS, or requires firewall allow list configuration, the Fully Qualified Domain Names (FQDNs) will also be region specific. See JumpCloud Data Centers for the URLs, FQDNs, and IP addresses.
- Navigate to Access > SSO Applications.
- To connect a new application, click + Add New Application. If the application already has SSO configured, select it from the Configured Applications list.
- Select the Provisioning tab.
- Choose attributes and enter the Base URL and Token Key, click Save.
Authorizing SSO Application Access
Users are implicitly denied access to SSO Applications. After you connect an application to JumpCloud, you need to authorize user access to that application. You can authorize user access from the Applications, Users List or User Groups page.
To authorize user access from the SSO Application’s page
- Log in to the JumpCloud Admin Portal.
![]()
If your data is stored outside of the US, check which login URL you should be using depending on your region. If your organization uses LDAP, RADIUS, or requires firewall allow list configuration, the Fully Qualified Domain Names (FQDNs) will also be region specific. See JumpCloud Data Centers for the URLs, FQDNs, and IP addresses.
- Go to Access > SSO Applications, then select the application to which you want to authorize user access.
- Select the User Groups tab. If you need to create a new group of users, see Get Started: User Groups.
- Select the check box next to the desired group of users to which you want to give access.
- Click Save.
To learn how to authorize user access from the Users or User Groups pages, see Authorize Users to an SSO Application.